Homemade Pork Pies
One of those proper kitchen jobs — a bit of patience, a bit of mess, and something worth waiting for.
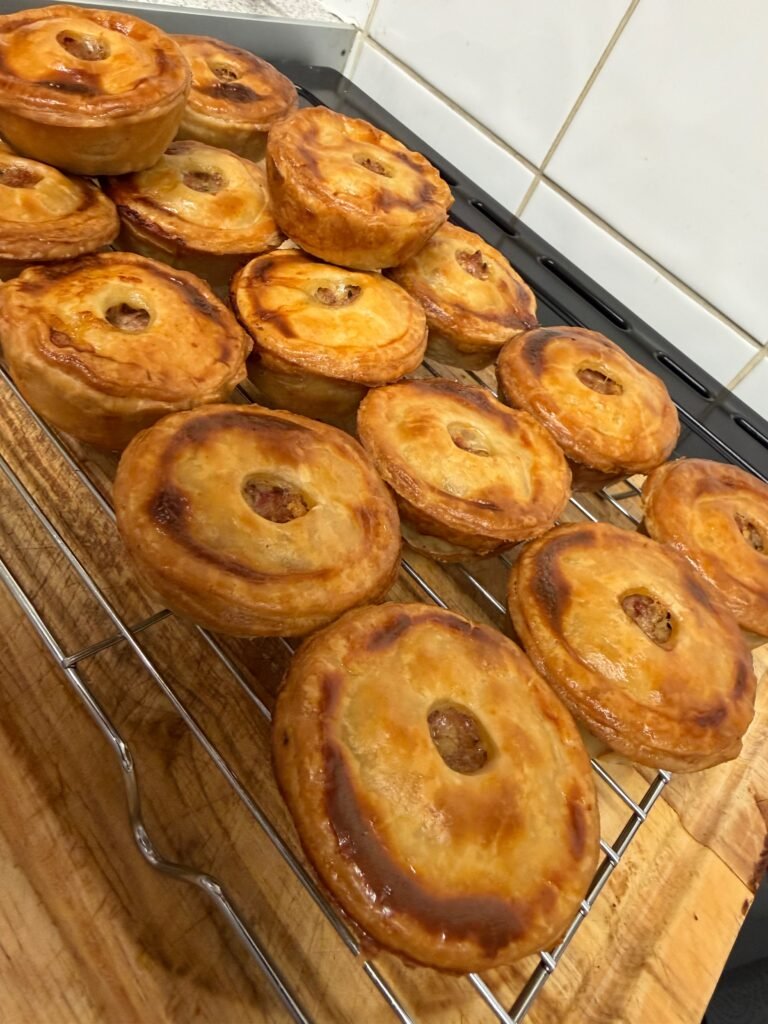
There’s something satisfying about making a pork pie from scratch. It isn’t the quickest thing you’ll ever bake, and it certainly isn’t the tidiest, but that’s part of the charm.
This is the sort of baking that feels old-fashioned in the best possible way: pastry made by hand, a proper savoury filling, and that moment when it finally comes out of the oven looking like something you’d be proud to put in the middle of the table.
We’re not pretending this is a professional bakery recipe. It’s simply the version that worked for us — made at home, enjoyed at home, and now shared from the gate.
Recipe at a Glance
Makes: 12–18 snack-sized pies
Prep Time: About 45 minutes, plus overnight chilling
Cooking time: About 25 minutes
Ingredients
For the hot water crust pastry
- 250ml water
- 200g lard
- 1 tsp salt
- 500g strong white bread flour
- 1 egg, beaten, for glazing
For the meat filling
- 500g pork mince
- 200g streaky bacon
For the spice mix
- 1 tsp salt
- 1 tsp white pepper
- 1 tsp dried thyme
- 1/2 tsp dried sage
- 1/2 tsp mace (optional)
For the Jelly
- 2 gelatine leaves or 1/2 sachet of powdered gelatine
- 200ml of chicken stock
Method
- Make the pastry
Weigh and sift the flour into a large mixing bowl, add the salt, mix together and set aside. Cut the lard into small pieces. Put the water into a saucepan, add the lard and heat gently until the lard has completely melted. I prefer not to boil the mixture, as hot fat and water can splash, so take care at this stage. - Bring the dough together
Make a well in the centre of the flour and carefully pour in the hot liquid. Using the handle of a wooden spoon, mix until all the flour has been incorporated. It can look as though it will never come together, but stick with it. Turn the dough onto a lightly floured surface, give it a gentle knead and shape it into a ball. Wrap and chill completely; I usually leave mine in the fridge overnight. - Prepare the filling
Cut the streaky bacon into small cubes or strips. Add it to the minced pork, then mix in the spices thoroughly. Cover and refrigerate overnight to allow the flavours to develop. - Roll and cut the pastry
The following morning, roll the cold pastry on a lightly floured surface to roughly the thickness of a pound coin. Use a 98 mm cutter for the cases, a 78 mm cutter for the lids, and a piping nozzle to make a hole in the centre of each lid. - Line the tins
Press the larger pastry rounds into muffin tins, making sure the pastry sits flat on the bottom. There is usually no need to grease the tins. Chill the lined cases for around 20 minutes. - Fill the pies
Roll the meat mixture into small meatballs and place them into the pastry cases, filling each one about three-quarters full. Leave enough room for the jelly later. - Add the lids
Moisten the outside edge of each lid with a little cold water and place it water-side down over the meat. Crimp the lid and case together to form a good seal, then chill the assembled pies for another 5–10 minutes. - Bake
Preheat the oven to 170°C fan or 180°C conventional. Brush the pies with beaten egg; add a little milk to the egg if you prefer a lighter finish. Bake for around 25 minutes, checking that the centre reaches at least 74°C. - Cool
Leave the pies in the tins for around 5 minutes, then transfer them to a wire rack and allow them to cool completely before adding the jelly.
Adding the Jelly
If using gelatine leaves, soak them in cold water for around 2 minutes. Squeeze out the excess water, then add the softened gelatine to the gently warming chicken stock. Stir until completely dissolved, then allow the mixture to cool for around 10 minutes.
I use what I call the pointed-knife method. Insert the tip of a knife through the hole in the top of the pie and, without removing it, slowly pour the jelly down the blade. The knife helps guide the liquid into the pie, and because we made that larger hole in the lid earlier, you can see the jelly rising when the pie is full.
You may need a little more or a little less jelly than the recipe suggests. If you make too much, don’t worry — it freezes very well.
A Few Notes from the Gate
Once the pies have cooled again, put them into the fridge, but I wouldn’t seal them tightly in an airtight container. I find that can make the pastry soften and sometimes turn a little soggy.
And I have to admit to one guilty pleasure. I always like to try one while it is still just a little warm. It’s something I look forward to every time I make these little beauties.
Eat them however you enjoy them — there really is no right or wrong way. Cold, I’m particularly fond of mine with a pickled onion and a little HP Sauce.
If using gelatine leaves, soak them in cold water for around 2 minutes. Squeeze out the excess water, then add the softened gelatine to the gently warming chicken stock. Stir until completely dissolved, then allow the mixture to cool for around 10 minutes.
I use what I call the pointed-knife method. Insert the tip of a knife through the hole in the top of the pie and, without removing it, slowly pour the jelly down the blade. The knife helps guide the liquid into the pie, and because we made that larger hole in the lid earlier, you can see the jelly rising when the pie is full.
You may need a little more or a little less jelly than the recipe suggests. If you make too much, don’t worry — it freezes very well.